Showing posts with label GetYoCraftOn. Show all posts

Pinned it, Made it my own {Inspiration Boards}


If you follow me on Pinterest, then you know I pin about a million things on any given day. I'll pin some funny stuff, I'll pin things to eat, I'll pin crafts to make. Let's be honest here, pinning is fun, but do we ever really make all the things we pin? I don't. I get inspired, then go and buy tons of crafting supplies I will never use, and then by the time I get it all together I'm so over the original craft I've completely lost interest. Sound familiar? 

A few weeks ago I came across this pin. It's the lazy person's version of Subway Art. You know for those of us who don't have fancy cutting machines, or the patience or skill to pull off freezer paper stencils. I totally roll my eyes at myself that I actually know what freezer paper stencils are. That's the kind of crap you learn when you pin at two in the morning. Anyway, this pin looked like something I could do with my girls, and isn't that what summer is all about? Doing the messy crafts with mom when she actually has a bit of time. Ok, that's a lie too, I literally scheduled this activity. As in I planned nothing else for this particular Thursday, since it was my day off, and I knew we could fit it in, if we did NOTHING ELSE. How's that for motherhood?

The craft itself is pretty easy. Buy some finished wood boards, any shape, we picked squares. Buy some paint in your color of choice, or use whatever colors you have on hand. Make sure you have some Mod Podge, or buy some if you need it. Don't worry, it's not scary, it's just glue. Then after you buy all this stuff (and foam brushes or paint brushes if you need them, like we did), take it all home and go through some old magazines you have lying around. Since I'm the magazine queen, we had a lot to choose from. This is the fun part, start tearing out what you want on your board. Now since I was trying to stay as close to the original pin as possible, I looked for words or quotes. Caitlin decided that she would rather put animals on her board, so that's what she looked for, and Mackenzie? Well Mackenzie painted her board, lost interest, and decided to play with Barbies after cutting a few magazine pages in to pieces so small they have alluded the vacuum ever since. 

So we painted, mutilated a few magazines, slapped a few coats of Mod Podge, and ta-dah, something that resembles a collage board or an inspiration board. 


I won't lie, I was surprised at how much fun I had. I remember being a teen and making collages. I was tempted to put things like lipstick and shoes on the board, but once I got going I was able to find quotes from some pretty inspiring actresses like Melissa McCarthy and Amy Poehler. I feel like this is the perfect thing to put in my office/craft room whenever I get in there and finally clean it. Until then, it's just hanging out on a shelf. I also made this board during a time of writers block and wouldn't you know that something as simple as this got my mind moving and the words just followed. Funny how that happens. 

So if you are looking for some last minute crafting to do with your kids, or if you just need to break out of a rut, this may be the craft for you. It's simple and messy, and it looks great even if you can't cut straight.
Which as you can tell, isn't one of my finer skills. 

Luck of the Irish {Get Yo Craft On}

This is a Get Yo Craft On tutorial that has appeared at Made By Munchies Mama and The Foley Fam {Unedited}. A wise blogger once told me to always eventually publish your guest posts on your own blog just in case. So with less than a week to go until St. Patrick's Day, here it is. The easiest craft you will ever do. Your welcome!

St. Patrick's day is super big around the Crutchfield house.  My husband is over a quarter Irish.  My mother in law cooks a St. Patty's Day feast each year, we even have colcannon!  And when the Hubbs was in college, he went to Ireland with his mom, aunt, and uncle and traced his Irish roots!  He found the county his Grandpa was born, and toured the Guiness Brewery.  Seriously, those were his highlights when he got home.  To say we celebrate St. Patrick's day is kind of an understatement.

Now if you know me and my blog, you know that if I'm crafting, it's easy!  I got some inspiration on Pinterest here and here, but you know me.  I want easy crafts with readily available materials.  Simple, affordable, and available at your local craft store.  So here it goes.  A little something for the luck of the Irish on St. Patrick's Day.


You will need:
Sorry for the glare.
I'm a tutorial making novice!
Canvas - mine is 8x10
Rainbow yarn or ribbon if you like
Letters of any kind in any shade of green
Shamrock punch -
I splurged on Martha since I'm sure to make more clovers around here
Green or green printed scrap book paper
Not pictured
Glue Gun or craft glue
Scissors

Directions: So easy you are gonna giggle!
Wrap yarn on canvas.
What ever side you choose.
My colors didn't come out like I wanted
so I cut strands and tied them in the back.


Then cut out some shamrocks!


Place your shamrocks to you liking


Then glue them in place. 
I used a glue gun because I'm impatient.
Then add you letters.  Mine say "lucky". 
You could choose "Happy St. Patty's" or "Kiss me I'm Irish"


Done and done friends!

Now I think I'd like to add a picture.  So, at my MIL's St. Patty's Day feast I will ask someone to take a photo of our little Crutchfield clan, using Instagram of course.  Then I will get the 4x4 picture printed, and modge podge it to this canvas.  St. Patrick's Day Celebrating and memories for years to come.

What do you think?  Do you think you will make one for yourself?


Get Yo Craft On {Valentine's Garland}


Garland seems to be all the rage. It's cute, I get it, but making it? I break out in a cold sweat just thinking about it. If you peep my Pinterest boards you will notice that I've been pinning Valentine's day themed garlands like a mad woman. No, I'm not crazy, or masochistic, I've been joining in on the It's Just Emmy Adopt Shop Swaps since October. Emmy started hosting fundraising garland swaps to fund her adoption. I was happy to help because it was so fun, and I got some goodies in return. Then something amazing happened. Not only did Emmy fund her adoption, but with the remaining funds, she decided to pay it forward and fund someone else's adoption. We are now funding the second family's adoption, and I have to tell you, this kind of fundraiser/pay it forward feels fantastic.

This time around for Valentine's Day, I again got matched with a super crafter! This always makes me nervous because I'm a novice crafter at best. So I looked and pinned and searched and came to the conclusion that I was never going to make something that used book pages, perfectly cut vinyl lettering, and bakers twine. So instead I set out to explore Michael's in the hopes that inspiration would strike! 

And it did!

Say hello to the easiest garland you will ever make. Simple supplies, easy assembly, and fantastic results. 

Which is everything I have ever wanted in a craft!


Get Yo Craft On!
The Easiest Garland you will ever make!
You will need:
Store bought metallic garland holiday theme of choice, I used Valentine's
(this is kind of a cheat, but hear me out)
Ribbon holiday theme of choice, again Valentines Day
(any color, width, wired or not)
Scissors
Ten minutes of your time

All you need to do is unwind the metallic store bought garland, the hearts pictured.
Then cut strips (size determined by you) of ribbon and tie them on in the empty spaces
between the hearts of the garland.
Keep cutting ribbon and tying until you are happy with the result.
And that's it!!

Enjoy!

Cinnamon Stick Reindeer {Get Yo Craft On}


When I was eight I was in a baton twirling company that had performance teams.  Being on the Team was an honor.  You had to try out and everything.  When I first tried out I wasn't really sure what was going on, but the following year I was excited and ready.  Being on the performance teams mean that twice a year, you put on big shows at all the studios.  For me this meant a week spent performing in my hometown, Salinas, then in Marina, Monterey, and Pacific Grove.  I'm not sure how my working Mom managed that, but I will tell you that from the time I was seven until I was 13 I ate many dinners in the car during performance weeks.

Every Christmas I get really nostalgic for Team.  Christmas was such a fun time when you were on Team.  We did Secret Santas.  The team mamas brought baked goods.  We always hit up McDonald's or Burger King after the shows.  It was magical, in my eight year old eyes.

Over the years of being on Team I received many ornaments as gifts.  I still have most of them and they hang on my tree every year.  As I hang them I remember when I got them, or what routine I did that year.  A few years ago I had to retire one of my favorites, a cinnamon stick reindeer I received the year I was eight.  When Christmas was still full of magic.  When a list to Santa was a top priority.  When green glittered sugar cookie trees were my favorite delight.  My poor cinnamon stick reindeer, his legs weren't as sturdy, his eyes had yellowed, his nose almost shred.  I was so sad to put him in a box, away in my craft room.  I missed him every year.

Once I got the crafting bug and started making my own ornaments, my mom suggested I try a cinnamon stick reindeer.  And for the past two years I got too busy, too distracted, and poor Mr. Cinnamon Stick Reindeer was forgotten.  This year I made a plan to make one, no matter what, and so on Veteran's Day, with my kids helping out, I made some Cinnamon Stick Reindeer.  I can't tell you how happy I am about these.  They smell delicious, but they also make my heart so happy and full of nostalgia, it may burst.

I'm not a crafting blogger, so this tutorial is not grade A, but I promise you they are easy to make.  The materials were bought a Michael's, and they aren't complicated.  I like my crafts affordable and easy.  If I can do them, you can do them.  And if you are crafty you can probably do them better.

I'd love to see your cinnamon stick reindeer if you make them.  If you do, please post a picture on Instagram and tag me: @absolute_mommy.


Cinnamon Stick Reindeer
Get Yo Craft On


Supplies:

Cinnamon sticks
small red poms
small google eyes
brown pipe cleaners (antlers)
green or red pipe cleaners (hanger)
felt (any color you'd like)

Not pictured:
hand saw (I promise you can do it)
pinking shears
scissors
glue gun
glue sticks
sharpee


Step one at top left:
Saw your cinnamon sticks in half, if you feel they are too long.
also if your cinnamon sticks didn't come with small pieces for the heads,
you will have to cut them.

Step two at top right:
cut your felt to fit like a saddle, I used pinking shears.
Also cut your pipe cleaners in half.

Step three at bottom left:
Fold your felt "saddle" in half and make a small cut.  Fold your green or red pipe cleaner in half and run it through the hole in your felt.  Then center your cinnamon stick legs and glue legs to felt and pipe cleaner.  Then glue the rest of the felt down.

Step four at bottom right:
Turn your ornament on it's side and place some glue just inside the felt fold on the cinnamon sticks.  This is where you are going to add your "head", a small piece of the cinnamon stick that you cut.  Hold in place until the glue sets.


Once the glue sets on your reindeer head, it should look like the picture on the top left.

Next add your eyes and red pom nose on the top right.

Fold your brown pipe cleaner in half and make a "V" for your antlers.

Add some glue into the open part of the cinnamon stick head and add your antlers.  Shape them in any way you want, photo bottom right.


And that's it.  I added a little bit of green ribbon on a few.  Then I added "2013" on one leg using a sharpee marker on a few others.  This tutorial is totally easy, just a little labor intensive if you have to cut your own cinnamon sticks.  But I promise they are totally worth it.  Super cute and do they ever smell like Christmas!!  Enjoy!  And Happy Christmas Tree Trimming!!

Candy Bar Mummies


This is not a blog where you will find tutorials by me.  If you do happen to see one, then know that it is super simple, super easy, and super cheap!  This is a great Halloween craft to kick off October.
It's so easy the kids could help. (This post originally appeared on Lena B Actually.)

PS:  This wasn't entirely my idea. 
You can see the pin here or
the original tutorial from The Idea Room, here.


Let's get our craft on!

Supplies:
Hersey Bars, regular size, fun size, or jumbo
(whatever you like, and in whatever flavors you like)
Google Eyes (I bought the self sticking ones)
White Crepe Paper
Not Pictured:
Double Stick Tape
Scissors
Steps:
1 - Attach your google eyes
2 - Put a strip of double stick tape the length of the candy bar on the back of the bar.
3- Attach your crepe paper to the tape on the back side of the bar and start wrapping.
4 - Continue wrapping the entire candy bar, don't worry about covering the eyes.
NOTE: I cut the crepe paper in half width wise for the fun size bars.
Now tear away at the google eyes so they peek through.
Super cute, right?

Now you can host a whole family of mummies for Halloween.
I thought that the fun size bars were perfect for little kids,
like toddlers and kindergartners.
That way if I take these to my Mac's preschool class,
the parents won't murder me for the chocolate overload!

Also if you are feeling really crafty, you can make lollipop ghosts with your kiddos.
This is a mini ghost using Dumdums and a napkin.
The perfect little pal for your candy bar mummy!


Happy Halloween friends and get yo' craft on!!


Get your shirt here!

Halloween Crafty Biz 2012

While you read this I'm at the Pumpkin Patch with 28 Kindergartners.
Say a prayer for me.
While I'm out, here are some crafty crafts I threw together at the last minute.
I'm notorious for spending tons on craft supplies,
and then not crafting a single thing.
Since Mac was still sickie on Monday, my mom came over.
Saint Linda saved the day.
And allowed me to do a few of my To-do Halloween projects.
Isn't there a "pinned it / made it" link up?
If so, tell me in the comments.
Some of these were Pinterest inspired!!


On my front door.
Don't worry it's not that fancy.
Letters.
Scrapbook paper.
Modge.
Ribbon.
Pumpkin.
Glue Gun.
See the original Pin for inspiration.
 
 
This is a canvas bag.
Plus paint and stencils.
I know, I'm that mom.
Why don't I just let them use a pillow case?
Well, because none of them are clean!
Also this took like five minutes, promise.
So if I can, so can you!
 
 
Hipster Pumpkins.
Seriously, two minutes.
$1 mustaches from Target.
$1 Googly eyes from Michael's.
Pumpkins.
A little tacky glue.
Halloween, LIKE A SIR!
 
 
I did a little something like this last year.
I just took it to another level when I saw this Pin.
btw, this pin gets a "HTTP 403", sorry
It's super easy, and you can get as creative as you want.
Plus, all the materials can be reused for Halloweens to come.
Awesome!
 
 
This is Caitlin painting her pumpkin in her undies.
Something about undies and crafting has her heart.
Fine.
At least she didn't stain her clothes.


And don't forget to check out these guys over here!
I got the inspiration here.
Lena has the full tutorial!
 
Happy Day before Halloween!
And don't forget to Get 'Yo Craft ON!!! 


St. Patrick's Day Fun {School Treats}

Can you tell we are getting into the St. Patrick's Day Spirit here at AbsoluteMommy?  Well today I'm back with a quick and easy gift for your office, kiddos classroom, or neighborhood friends.  I promise it's super quick and easy, AND you can print out the tags for FREE!

That's right Veronica, from Good Luck Charm Designs has created a printable just for you!  So, let's get in the spirit, wear some green, and get our Irish ON!


All you need are:
Clear treat bags with twist ties or ribbon
Lucky Charms Cereal
This Printable
Circle punch (only if you have one, otherwise scissors work)
Double stick tape


I used a treat bag about half the size of a "standard" size.  I think it's for candy making.  Anyway, I filled it with about 1/2 cup Lucky Charms, used the twist tie to close, then used double stick tape to attach the printable. 

Now, these are for Caitlin's preschool class.  I was thinking about filling the bags with Skittles or Starburst so it would look like a rainbow.  Then I thought about how I would feel if Caitlin brought home a bag of Skittles...

Well Lucky Charms are super sugary for cereal, but I feel like it's ok since they are considered a breakfast choice.  Plus my preschooler LOVES the tiny marshmallows, so I thought I'd stick with the cereal.  But if you are making these please go wild! 

This printable has endless possibilities!
To download this printable click here!
This will take you to the Good Luck Charm Designs Etsy Shop.
Please note that it looks like it costs $0.20,
but it doesn't.
Click on the picture for downloading instructions.

Happy St. Patrick's Day!  Will you use this printable?  How cute are the other items in Veronica's shopDon't forget she does custom orders!!

No WIW post today!  I promise to try harder this week!

Happy Blogging,
Megan

For MORE St. Patrick's Day Fun
Where you can do a little of this!

Get Yo Craft On! Vday Cup Holder


This my friends is one craft project I'm super proud of.
This is like the Nativity Ornament I did.
This makes me look crafty.
Let's talk about the inspiration.


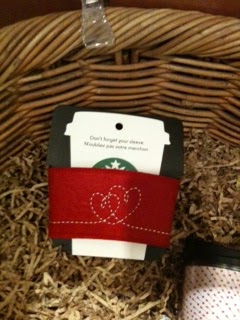
A few Saturdays ago I was visiting one of my BF, Starbucks.
Since I walked in instead of drive thru, I decided to shop around.
They have super cute things for Valentine's Day including that lovely above.
Then I looked at the price, the felt and the stitching and thought:
Seriously, I can do this.
So I did.
You will need:
Felt,
felt stickers (yes, felt stickers!),
glue gun,
Velcro,
scissors / pinking shears (optional)
What you do:
Use the template provided by the nice people at
It's all ready to be printed out.
Easy!


Line it up on the fold of the felt of your choice.
I pinned it because I don't have a steady hand.
Then you can use the pinking shears on it like I did below.
You will end up with this:


Now in the photo below, I used the template
on some scrap felt for a little reinforcement.
I cut that piece in half, and glued it to the original red piece.
This is because the felt I bought was kind of thin.


Now for the fun part!!
Decorating!
The possibilities are endless.
You could use what ever scrap fabric, felt, stickers, jewels, etc.
Below I used another piece of felt, cut to the template
with a heart cut out of it.
Glue it all together with that fancy glue gun.


Then I got a little fancy and added the stickers, below.
Reinforced with said glue gun.

Now for the Velcro.
I measured the placement using a Starbucks grande cup.
This helped me figure out where the Velcro should go
and how tight the cup holder should be.
My Velcro was adhesive, but I added a little glue gun just in case.

I put the Velcro pieces together and re-wrapped the cup.
Then I pulled back the top, added some glue and placed the Velcro on the other side.

Fast and easy, it should look like this.

And one side of your cup holder should have Velcro showing.
(See below)
The other should not.

And when you are finished you should have something like this.

Or these.


I admit the one below is my favorite.

So what do you think? 
Wouldn't this make an excellent teacher gift? 
Maybe one for your best friend? 
I think this would be an awesome Valentine's gift for any Starbucks lover! 
You could get a gift card, slip it in the cup, and add the cup holder. 
Whatever you decide, get yo' craft on friends!

Happy Blogging (and crafting),
Megan

Linking with Lollipops!
lollipops